FIELD MANUAL - COLLAGE STUDIO
Collage Studio - Setup & Usage Guide
Everything you need, in plain English. No tech-speak.
ON THIS PAGE
Email [email protected] and a real person answers - usually within a day. No question is too small. You can also use the contact form.
1. Before you start
What Collage Studio does
You select photos in Lightroom Classic. Collage Studio lays them out as finished pages - a print for the wall, a spread for an album, a post for Instagram or a long board for your blog. You pick the size and the layout, adjust anything you like, and click Save to Lightroom. The finished collages are made from your edited photos at full resolution and land back in your catalog.
The designer opens in your web browser. It runs on your own Mac, so your photos never leave your computer and it works with the internet off.
What you need
- A Mac with Apple Silicon (M1 or later) running macOS 14 Sonoma or newer. Intel Macs and Windows are not supported yet.
- Adobe Lightroom Classic. The cloud-based "Lightroom" app is not supported.
- Any modern browser - Safari, Chrome, Firefox, Arc or Edge.
Installing
- Unzip the download. You get two folders:
collage-studio.lrpluginandcollage-studio-server. - Move both folders to the same place. They must stay side by side - the plugin looks for the other folder next to itself. A tidy spot is
~/Library/Application Support/Adobe/Lightroom/Modules/. - Add the plugin to Lightroom. In Lightroom Classic, open File > Plug-in Manager, click Add and choose the
collage-studio.lrpluginfolder.
Activating your license
Go to Library > Plug-in Extras > Activate License..., paste the key from your order email and click Activate. You only do this once per Mac. Moving to a new Mac? Run Deactivate License on the old one first - your license covers one Mac at a time.
2. Easy start - your first collage
Six steps. At the end you have a finished collage in your catalog.
- Select 6 to 12 photos in Lightroom's Library. Any mix of portrait and landscape works.
- Open Library > Plug-in Extras > Collage Studio... Lightroom prepares the photos for a few seconds, then the designer opens in your browser with the page already laid out.
- Pick a size on the left - for example Print and 8 × 10 in.
- Click a layout you like in the wall on the right. Every option already shows your own photos.
- Click Save to Lightroom in the top right corner, check the name, and click Save.
- Look in Lightroom. The collage appears in the collection Collage Studio > [your project name].
3. The full workflow
Select → Lay out → Fine-tune → Save → Reopen any time
Select
Collage Studio fills pages in your Lightroom order, so arrange the photos first if the order matters. Select them and open Collage Studio... from Library > Plug-in Extras (it is under File > Plug-in Extras too). Up to 200 photos make one project. If exactly one photo is selected, Collage Studio asks whether you meant that photo or everything in the view.
Lay out
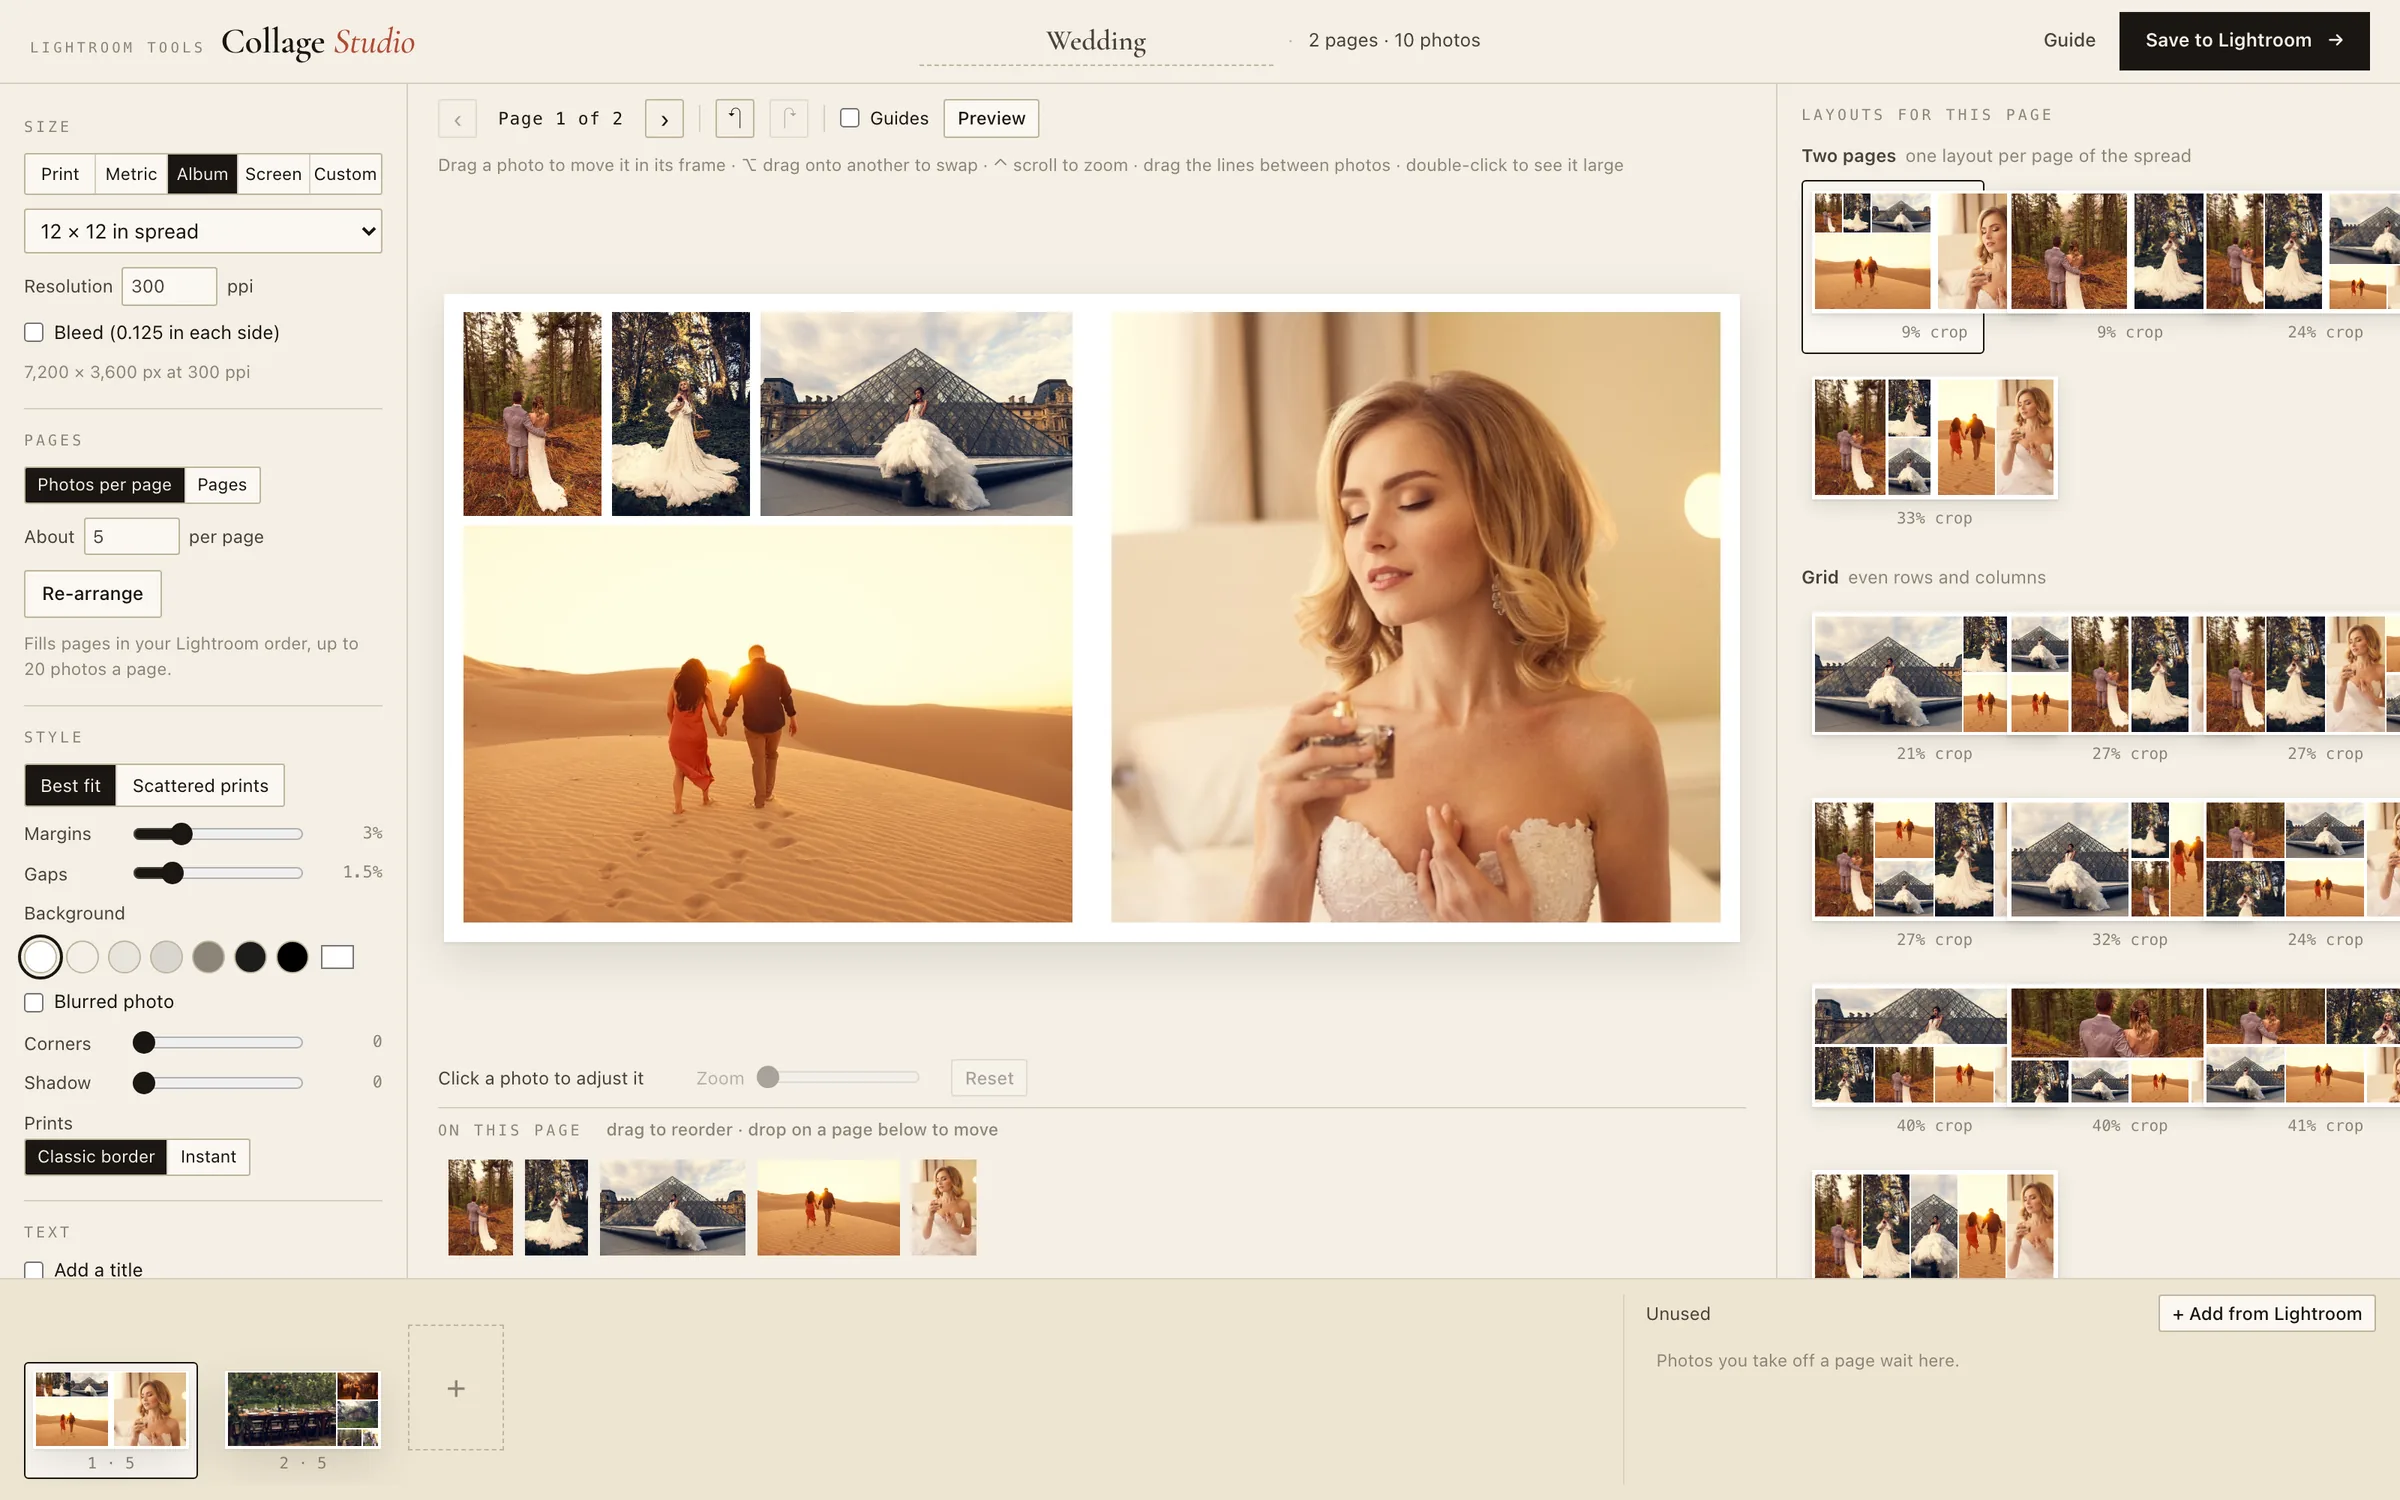
The designer splits the photos into pages - about 8 per page to start - and lays out each one. Faces and people are found in every photo, and each crop is framed around them. The wall on the right shows other layouts for the page you are on, grouped by kind: No crop (every photo whole), Grid (even rows and columns), Two pages (album spreads) and Scattered (prints tossed on a table). Each one shows how much it crops.
Fine-tune
Everything on the page responds to the mouse. Drag a photo to move it inside its frame. Drag the lines between photos to resize them. Hold Option and drag one photo onto another to swap them. Double-click a photo to see it large, or click Preview to see the whole page.
Save
Save to Lightroom renders every page from your edited originals at exactly the size it needs, then adds the finished files to your catalog. A ten-page album takes about a minute.
Reopen any time
Each saved collage remembers how it was made. Select it in Lightroom and choose Edit Collage... to pick up where you left off.
4. Every menu item and control, explained
In Lightroom (Library or File > Plug-in Extras)
Collage Studio...
Starts a new collage project from the selected photos and opens the designer.
Edit Collage...
Reopens saved collages. Select one or more saved pages of a collage and choose this item - the designer opens with the pages exactly as you left them. To add photos at the same time, select them together with the collage pages. Saving again replaces the old pages in the collection; the earlier files stay on your disk.
Activate License... / Deactivate License
Enter your license key once per Mac, or free it before moving to a new Mac.
Size (left panel)
- Print - 4 × 6 to 24 × 36 in, portrait or landscape.
- Metric - 10 × 15 cm to A1.
- Album - single pages or two-page spreads, 8 × 8 to 12 × 12 in, and 20 or 30 cm.
- Screen - Instagram and Facebook posts, stories, Pinterest pins, Full HD, 4K, and blog boards 1600 or 2400 pixels wide that grow as tall as the photos need.
- Custom - any width and height, in inches, centimetres or pixels.
Resolution is 300 ppi for prints - leave it unless your lab asks for something else. Bleed adds 0.125 in on each side for labs that trim the edge.
Pages
Choose Photos per page (about how many photos each page holds, up to 20) or Pages (how many pages to spread them over), then click Re-arrange. Re-arranging refills every page in your Lightroom order.
Style
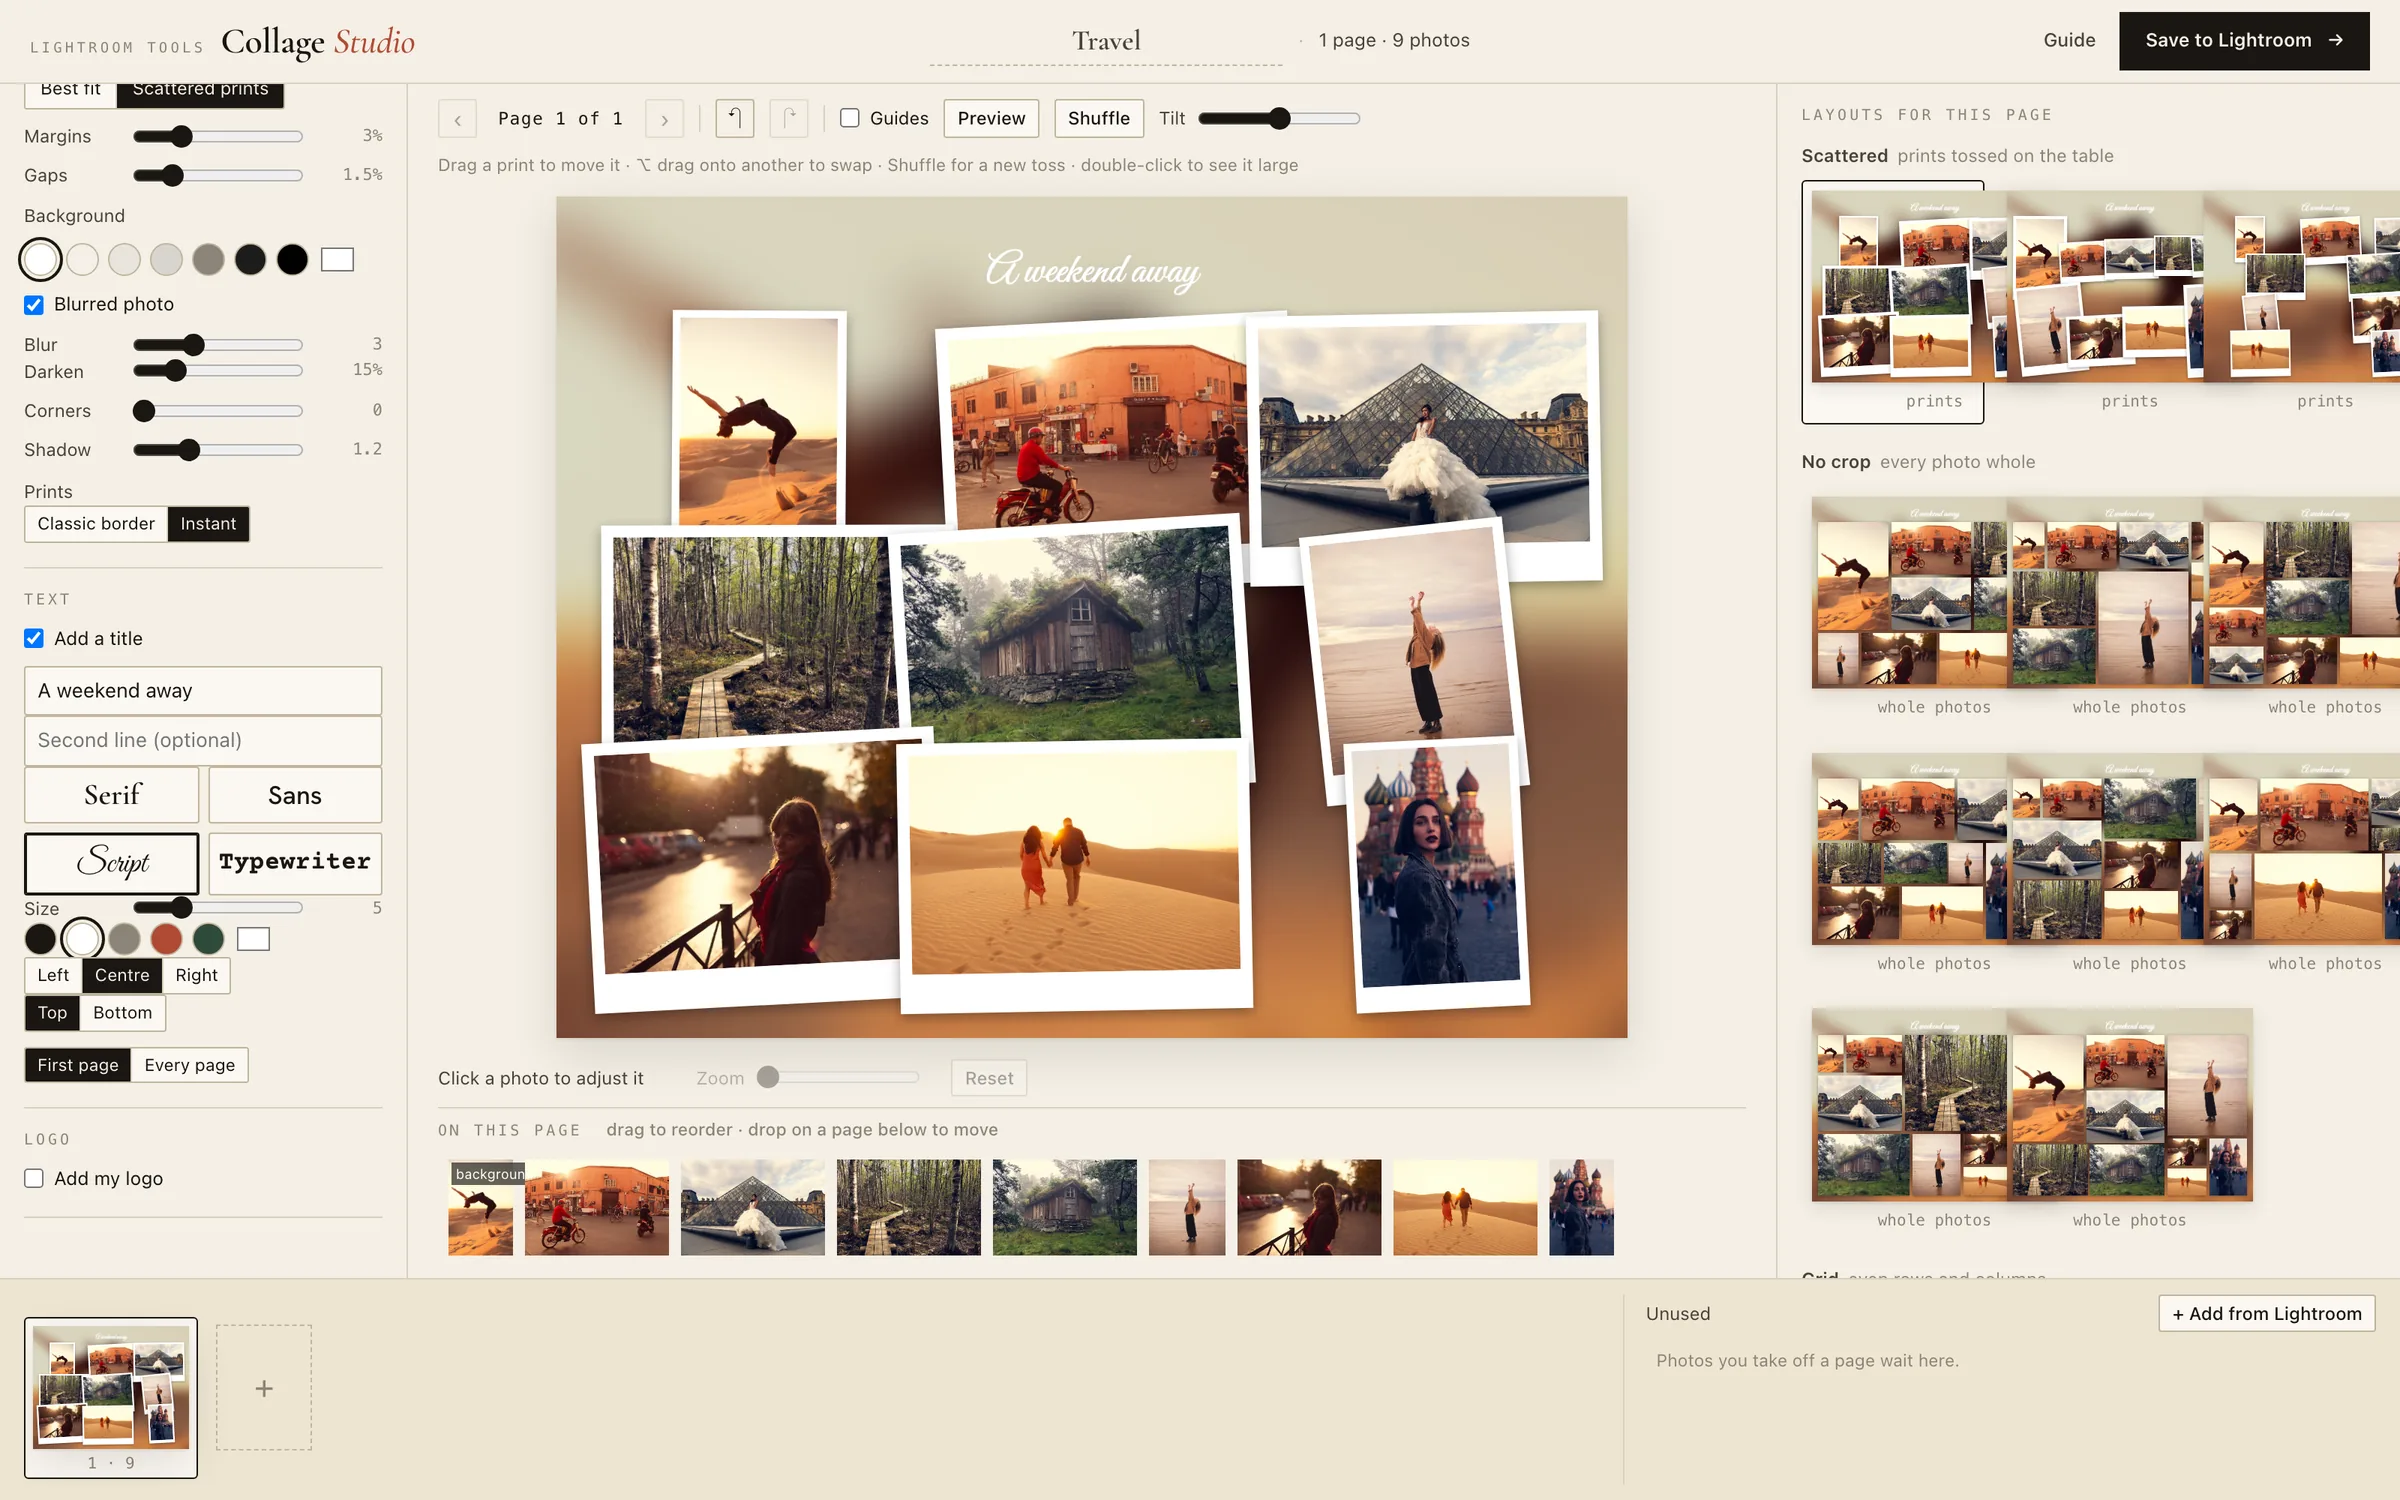
- Best fit / Scattered prints - neat layouts, or photos tossed like prints on a table. In Scattered, Shuffle tries a new toss and Tilt sets how crooked the prints lie.
- Margins and Gaps - the border around the page and the space between photos.
- Background - a colour, or Blurred photo to use one of your photos, blurred and darkened, behind the others.
- Corners and Shadow - rounded corners and a soft shadow under each photo.
- Prints - Classic border or Instant (a deeper bottom edge, like an instant print).
Text and logo
Tick Add a title for a title and an optional second line. Pick Serif, Sans, Script or Typewriter, a size, a colour, the alignment, Top or Bottom, and whether it goes on the First page or Every page. Tick Add my logo and choose a PNG file to place it in a corner or centred at the bottom, at the size and opacity you like.
The page in the middle
- Page arrows - move between pages. The ↶ ↷ buttons undo and redo (Cmd+Z and Shift+Cmd+Z work too).
- Guides - shows where the lab trims a page with bleed, and the fold of a spread. Guides never print.
- Click a photo to adjust it: the Zoom slider enlarges it inside its frame, Reset puts it back. In Scattered you also get Bring to front and Use as background.
- On this page - the photos of this page, in frame order. Drag one to reorder, or drop it on another page at the bottom to move it there. The small × sends a photo to Unused.
Pages and Unused (bottom)
The strip at the bottom shows every page; click one to edit it, or click + for a new page. Unused holds photos you took off a page - drag them back onto any page. + Add from Lightroom adds the photos currently selected in Lightroom, from any folder, to Unused.
Save to Lightroom
- Name - the file names and the collection name.
- Save in - Collage folder (one folder per project, in
~/Pictures/Collage Studiounless you pick another with Change...) or Next to the photos: each collage goes into the folder of its most recent photo and sorts right after it, in Lightroom and in Finder. Position chooses after its last photo, first or last in the folder. - File - JPEG (with a quality setting) or TIFF.
- Colour - sRGB for most labs and every screen, Adobe RGB or Display P3 if your lab or printer asks for it.
- Sharpen for - Screen, Matte paper, Glossy paper or Off. It is Lightroom's own output sharpening.
- Collection - the collection name under Collage Studio.
Before you save, the dialog lists anything worth knowing - for example a photo that would print below 200 ppi at this size.
5. Tips for the best results
- Put the photos in order first. Pages fill in your Lightroom order. Sort by capture time, or drag them into order in a collection, and the album tells the story from start to finish.
- Choose the size before the layout. Layouts are made for the shape of the page, so a new size gives you a fresh set of options.
- Try No crop first for people. Every photo stays whole, so nobody loses the top of their head.
- Mix portrait and landscape photos. A page with both shapes gives the layouts more to work with than eight photos of the same shape.
- Use Preview before saving. It shows the page large without the guides - the closest thing to holding the print.
- Watch the ppi marks. A photo that shows a number like 140 ppi on the page will print below 200 ppi and may look soft. Make it smaller on the page, or pick a smaller print.
6. Real-world scenarios
The wedding album - 60 selects, 12 × 12 spreads
Put the album selects in story order in a collection, select all 60 and open Collage Studio. Choose Album > 12 × 12 in spread, Photos per page 4, and click Re-arrange: you get 15 spreads. Walk through them and pick from Two pages in the wall, so each side has its own layout and no face lands on the fold. Tick Bleed, then save as TIFF in Adobe RGB, sharpened for glossy paper, ready for the album lab.
A year of family photos on the wall
Select twenty favourites from the year and choose Print > 16 × 20 in. Set Pages to 1 so all twenty share one page, pick a No crop layout so nobody is cut, choose the cream background and add a title like The Garcias - 2026 in Serif at the bottom. Save as JPEG in sRGB - what most print shops expect.
A shoot recap for the blog or Instagram
For the blog, choose Screen > Blog board · 1600 wide, any height: the board grows as tall as the photos need, and the No crop layouts keep every frame whole. For Instagram, choose Instagram portrait 4:5 and Photos per page 3 or 4 - each page becomes one slide. Save next to the photos, so the posts sit with the shoot.
A client sneak peek, the same evening
Select six to nine favourites from the session, choose an Instagram or 8 × 10 size, tick Add my logo and put it in a corner at low opacity. Save with Next to the photos, and the sneak peek is in the shoot's folder, ready to send.
7. Frequently asked questions
Setup
Where do I find Collage Studio after installing?
Under Library > Plug-in Extras (and File > Plug-in Extras) in Lightroom Classic. If it is not there, check File > Plug-in Manager - Collage Studio should be listed and enabled.
Does it work on an Intel Mac or Windows?
Not yet - it needs a Mac with Apple Silicon (M1 or later) and macOS 14 or newer. Tell me if you need Intel or Windows; demand decides what comes next.
Can I use it on two Macs?
Your license works on one Mac at a time. Run Deactivate License on the old Mac, then Activate License... on the new one. No access to the old Mac any more? Email support and I will reset it.
Your photos
Does Collage Studio change my photos or my edits?
No. It reads your edited photos and writes new files - the collages. Your originals, edits, ratings and keywords stay exactly as they were.
Where are my saved collages?
In Lightroom, in the collection Collage Studio > [project name]. On disk, in ~/Pictures/Collage Studio/[project name], or in the photos' own folders if you chose Next to the photos.
Do my photos leave my computer?
No. Everything runs on your Mac. No account, no upload, and it works offline.
Does it work with RAW files and my edits?
Yes. Lightroom renders every photo with your edits applied, whatever the original is - RAW, JPEG, HEIC or anything else Lightroom opens. The collage looks like your edits, not the raw file.
Designing
How many photos can one collage have?
Up to 200 photos in a project, with up to 20 on a page. Select more and Collage Studio offers to continue with the first 200.
Can I put the same photo on two pages?
No - each photo sits on one page of a project. Select it twice in Lightroom (as a virtual copy) if you really want it twice.
Can I change a collage after saving it?
Yes. Select its pages in Lightroom and choose Edit Collage.... Saving again replaces the old pages in the collection; the earlier files stay on disk in case you want them.
Does it keep my design if I close the browser?
Reloading the page keeps everything. Until you save, though, the design lives only in that browser tab - click Save to Lightroom to keep it for good. After that, Edit Collage... reopens it any time.
Printing
Which colour space should I choose?
sRGB unless your lab asks for something else - nearly every print shop and every screen expects it. Choose Adobe RGB or Display P3 only if your lab or your own printer is set up for it.
What is bleed and do I need it?
Bleed is a little extra picture around the edge (0.125 in each side) that the lab trims off, so no white sliver shows after cutting. Albums and full-bleed prints usually need it; your lab's instructions will say.
Buying
Can I get a refund?
Yes - 30-day money-back guarantee, no questions asked. Email support within 30 days of purchase and you get a full refund.
8. Troubleshooting
Chrome blocked the download as "suspicious"
Collage Studio is brand new, so Chrome hasn't seen many people download the file yet and holds it back. Click the downloads icon at the top right of Chrome, click the arrow next to collage-studio-plugin.zip, then click Download suspicious file. The plugin is signed with our Apple Developer ID and notarized by Apple.
"Could not find the Collage Studio engine" or "Failed to start the Collage Studio engine"
The two folders are not side by side. Make sure collage-studio.lrplugin and collage-studio-server sit in the same folder, then restart Lightroom. Still stuck? Email support with the text from the message.
"Select the photos for your collage first"
Nothing usable is selected - videos are skipped, so a selection of only videos counts as empty. Select some photos in the Library and try again.
"Lightroom could not render N photos - are the originals online?"
Those originals are missing or on a disconnected drive, with no Smart Preview to fall back on. Connect the drive (or use Library > Find All Missing Photos), then save again.
The browser says Lightroom stopped responding
Lightroom has to stay open on the same catalog while it saves. If you closed it or switched catalogs, open that catalog again and click Save in the browser once more. If the page no longer responds, start again from Lightroom - nothing in your catalog was changed.
"Lightroom was busy and the collages could not be added"
The files are saved - the message names the folder - but Lightroom was busy with something else and could not add them. Import that folder with File > Import Photos and Video (choose Add) to bring them in.
A photo looks soft in the print
It is printing below 200 ppi - usually because only a Smart Preview was available, or the photo was heavily cropped. Connect the originals, make the photo smaller on the page, or choose a smaller size.
9. Need help?
Email [email protected] or use the contact form - I answer personally, usually within a day. Missing a size or a layout? Tell me what would save you time.
Planning an Instagram feed too? Instagram Grid Planner sequences your photos by colour and designs carousels, and Look Slots keeps nine develop looks one keypress away, so every photo on a collage shares one edit.
THE PLUGIN THIS MANUAL BELONGS TO Collage Studio - $25 launch price