Google Photos - Setup & Usage Guide
Everything you need, in plain English. No tech-speak.
1. Before you start
What this plugin does
It publishes photos from Lightroom Classic to Google Photos. You skip the manual export-then-upload dance - drag photos into a Published Collection, click Publish, and they appear in a Google Photos album. Edit a published photo later? Click Publish again and the album updates without leaving duplicate copies behind.
Two things make this worth the $9.99 over uploading by hand:
- Publish straight from the catalog. No JPEG export step, no "where did I save that file?" hunt. Lightroom renders the photo with all your edits baked in, and the plugin uploads it.
- Edit, re-publish, no duplicates. When you change a photo that's already up there, the plugin uploads the new version and moves the old one to a clean-up album. Your Google Photos album stays one-clean-version-per-photo, not five.
What you need
- Adobe Lightroom Classic. The cloud-based "Lightroom" (previously Lightroom CC) is not supported.
- A Google account with Google Photos turned on.
- The plugin zip from your purchase email and your license key (also in the email).
- Works on macOS and Windows.
One important constraint to know up front
This is a Google rule, not a plugin limit. Google's Photos service does not let outside apps add photos to albums you made by hand in the Google Photos website or app. So every album you fill from Lightroom is one you created from Lightroom - by making a new Published Collection. If you already have an album in Google Photos you'd like to add to, you'll need to make a fresh Published Collection in Lightroom and use that instead. (You can still see your hand-made albums in Google Photos; the plugin just can't write into them.)
2. Easy start - your first 5 minutes
If you only read one section, read this one. Five steps, end-to-end, from zip file to your first photo live on Google Photos.
Step 1 - Install the plugin
- Unzip the file from your purchase email. You'll get a folder called
google-photos.lrplugin. - Move that folder somewhere permanent - Documents, Desktop, or the standard Lightroom modules folder. Any spot works as long as you won't delete it later.
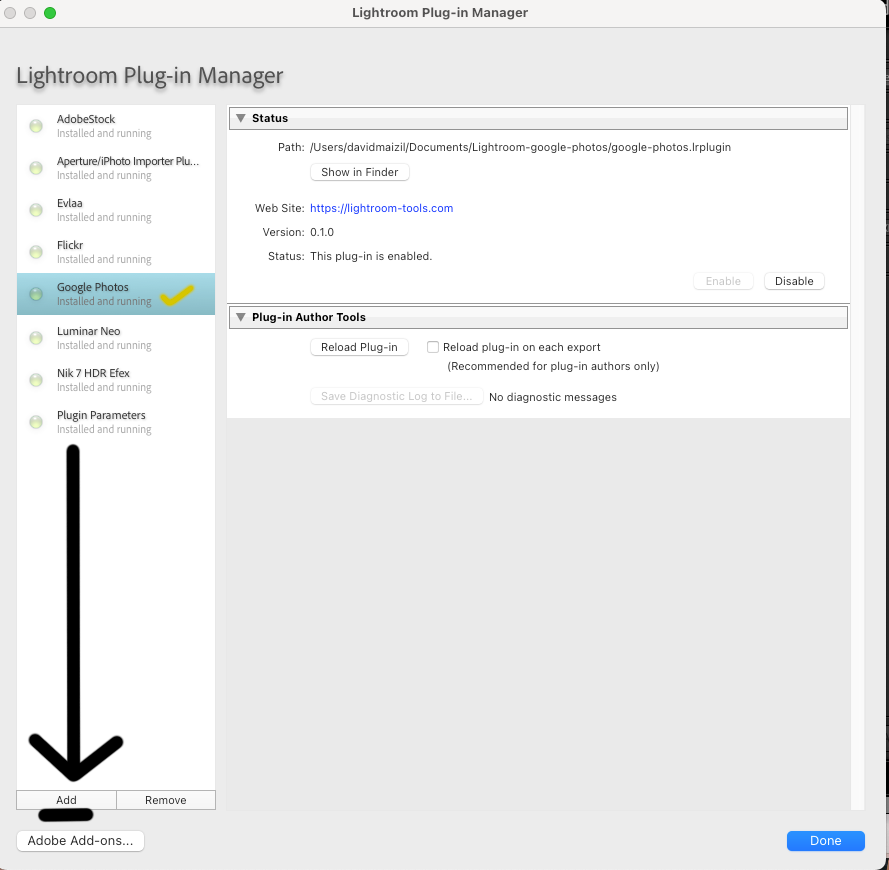
- Open Lightroom Classic. Go to File > Plug-in Manager.
- Click Add and select the
google-photos.lrpluginfolder. - You should see Google Photos in the list with a green Installed and running status.
Show screenshot - Plug-in Manager
Step 2 - Activate your license
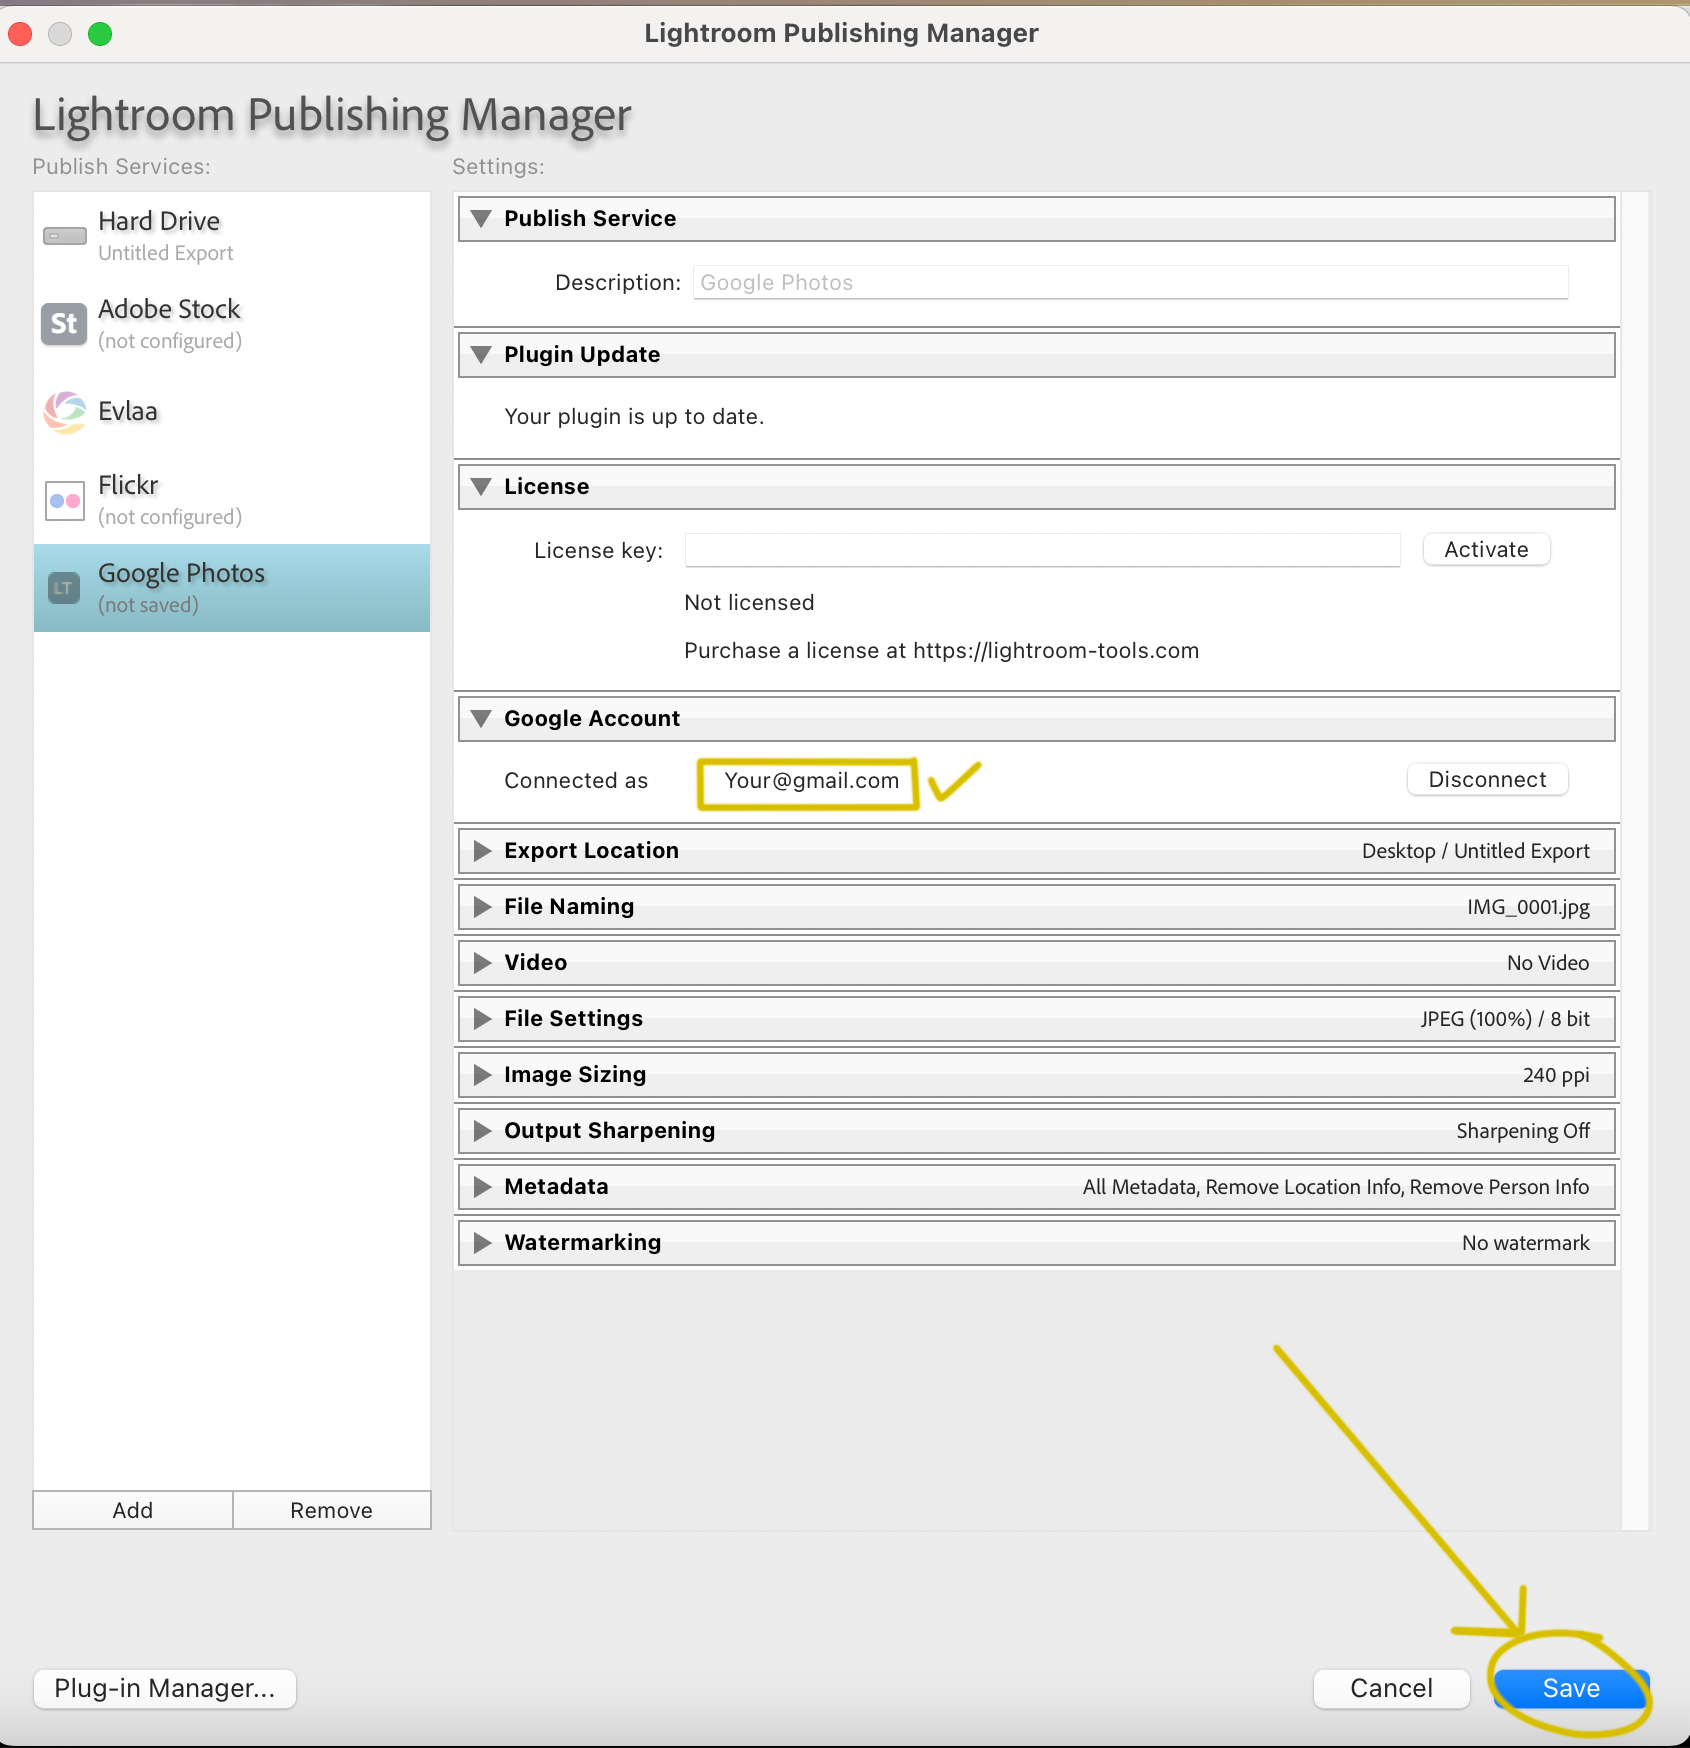
In the Library module, find the Publish Services panel on the left sidebar. Click Set Up… next to Google Photos. The settings dialog opens.
- Paste your license key from the purchase email into the License field.
- Click Activate. You should see a green Licensed status.
Your license works on one computer at a time. Need to switch machines? Click Deactivate on the old one first, then activate on the new one.
Step 3 - Connect your Google account
- Still in the settings dialog, click Connect to Google Photos.
- Your browser opens. Sign in to your Google account and click Allow to give the plugin permission to upload.
- Back in Lightroom, you'll see Connected as [email protected].
- Click Save.
Show screenshot - Publish Service settings
Step 4 - Make your first album
- In the Publish Services panel, right-click Google Photos and choose Create Published Collection.
- Name it whatever you want the Google Photos album to be called - for example, Summer 2026.
- The album is created in your Google Photos account right then, empty and ready.
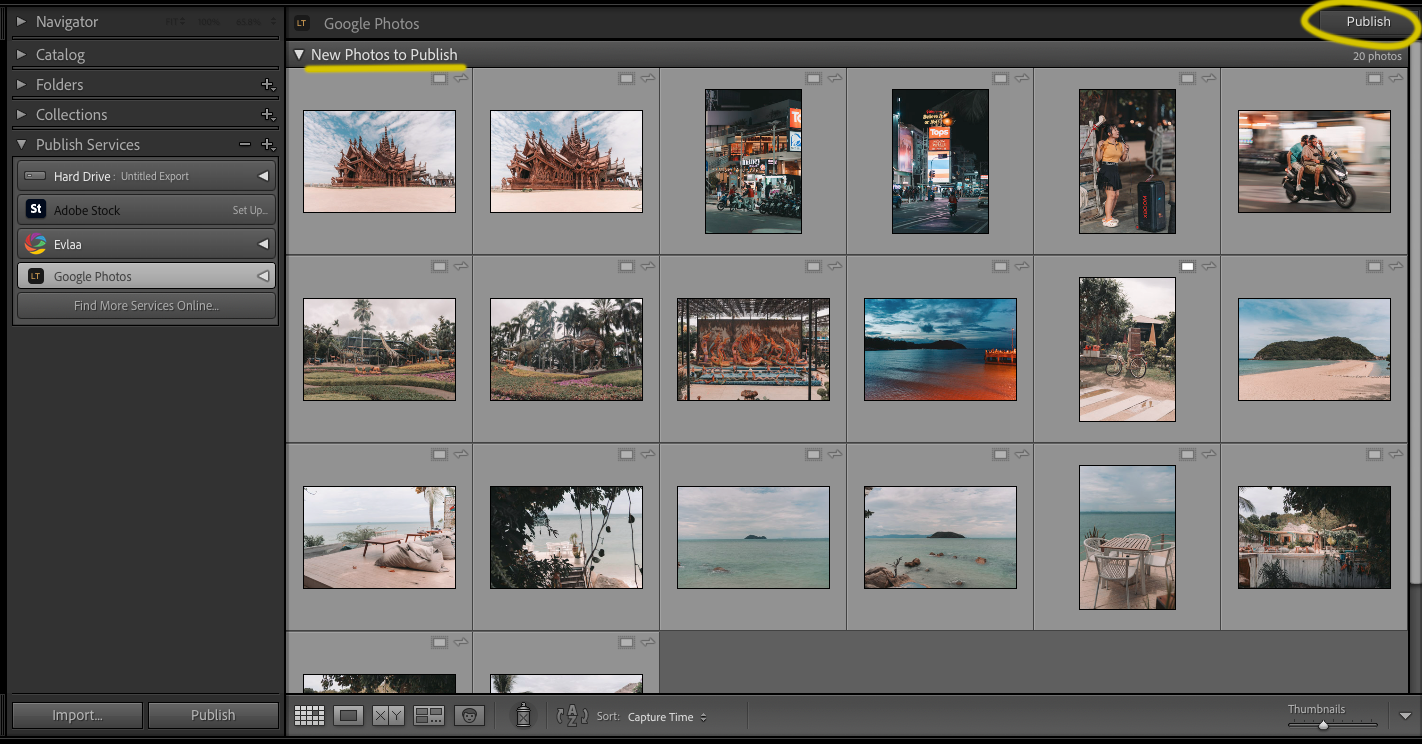
Step 5 - Drag photos in and publish
- Drag a handful of photos from your Library into the new Published Collection.
- They show up in a New Photos to Publish section at the top.
- Click the Publish button at the bottom of the panel.
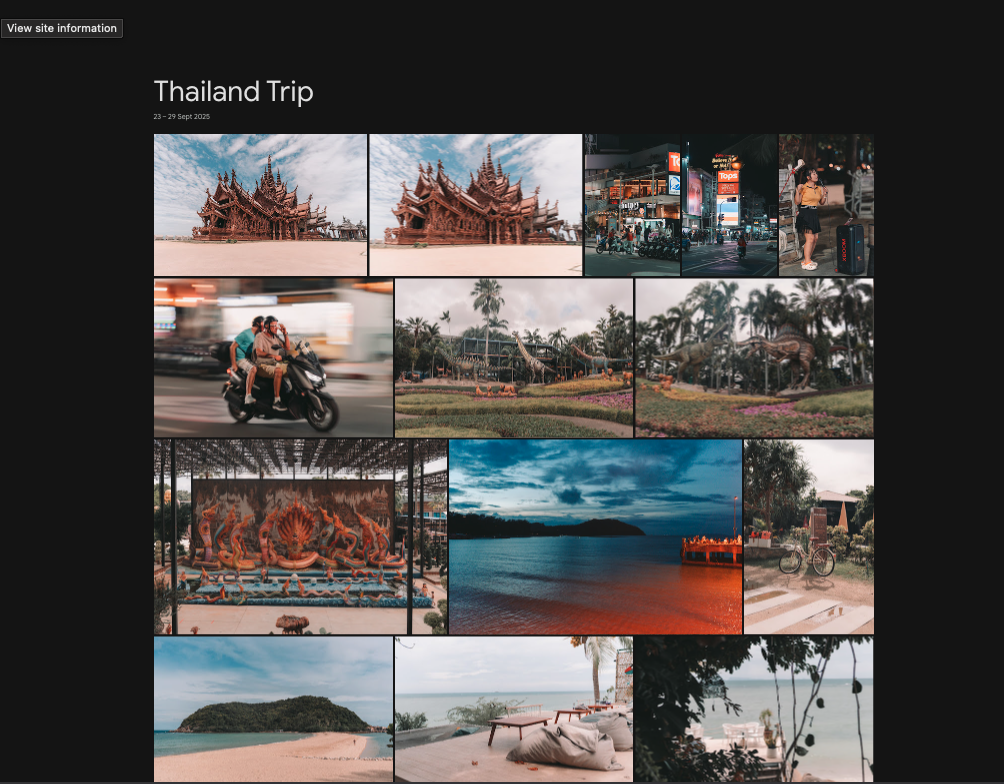
- A progress bar runs. When it finishes, open Google Photos in your browser - your album is there, photos and all.
Show screenshot - New Photos to Publish
Show screenshot - Google Photos album
That's it. From here, you can edit photos in Lightroom and re-publish, add more photos to the same album, make more albums, or share albums from the Google Photos side. Read on for the full workflow and every option.
3. The full workflow - Connect, Publish, Edit, Manage
The plugin runs on a loop. Each pass keeps your Google Photos albums in sync with what's in Lightroom.
Connect → Publish → Edit → Re-publish → Manage
3.1 Connect - one-time setup
You connect Lightroom to your Google account once. Sign in, grant permission, save. From then on the plugin remembers you. The only times you'll come back to this step:
- You want to switch to a different Google account.
- You revoked the plugin's access in your Google security settings and need to reconnect.
- You moved Lightroom to a new computer.
3.2 Publish - send photos to Google Photos
Make a Published Collection, drag photos in, click Publish. The plugin asks Lightroom for a rendered JPEG (all your edits baked in), uploads it, and adds it to the matching album on Google Photos. No export dialog, no save-to-disk, no choose-a-folder.
You can also drag photos into an existing Published Collection any time. Anything new sits in New Photos to Publish until you click Publish.
3.3 Edit - change the photo in Lightroom as usual
Open a published photo in the Develop module. Change exposure, white balance, crop, whatever. Lightroom marks it as a Modified Photo to Re-Publish automatically - you don't have to do anything else.
3.4 Re-publish - update Google Photos without duplicates
Click Publish again. The plugin notices the photo has a new version, uploads it, and moves the older version to a separate album in Google Photos called To Delete (Lightroom Plugin). Your main album stays clean: one current version per photo.
You go to that To Delete album when you're ready and delete the old versions yourself, in the Google Photos website or app. (Google doesn't let outside plugins delete photos for you - see the FAQ.)
Show screenshot - Modified Photos to Re-Publish
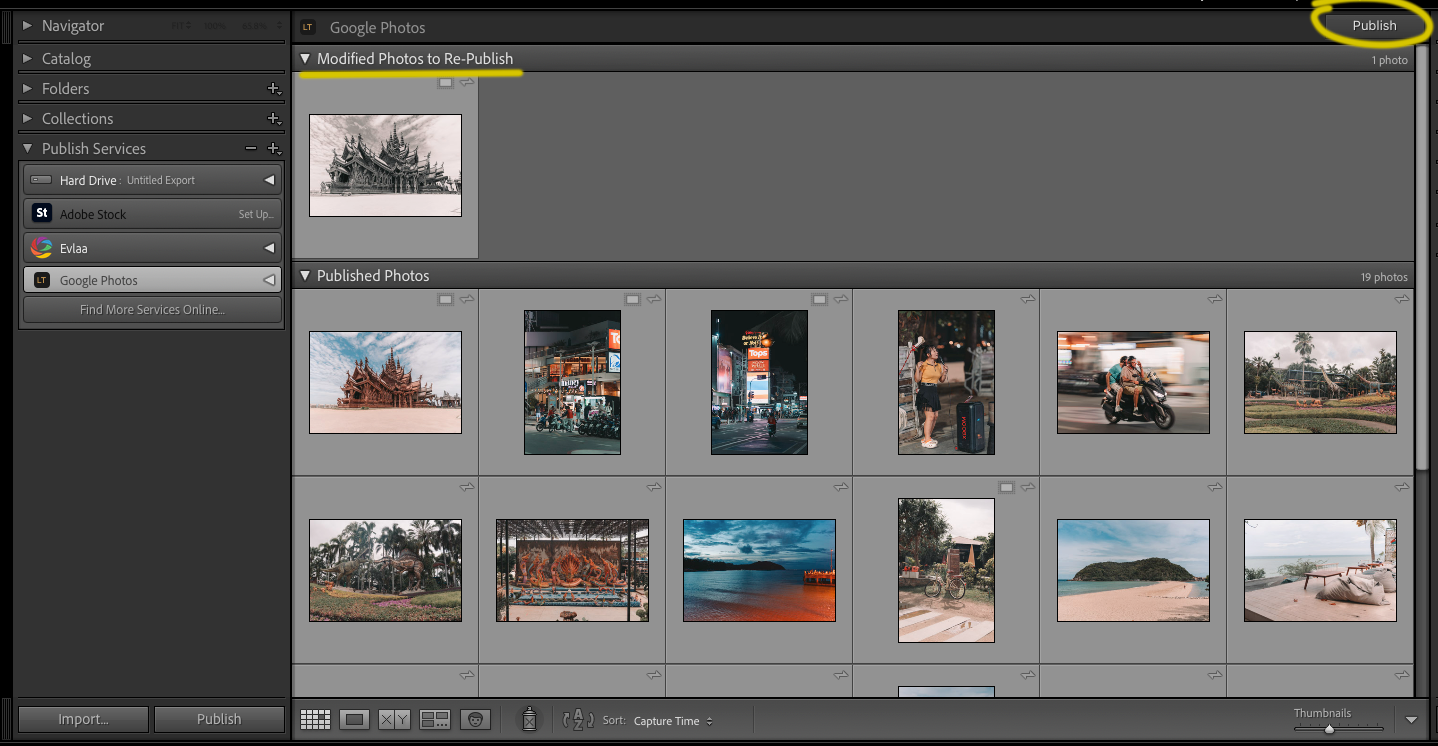
Lightroom flags a photo as needing re-publish even if you only changed a keyword or caption - not a visual edit. The plugin notices this and skips the upload for those photos. You'll see a short note like "Skipped 3 photos (metadata only)." when you click Publish.
3.5 Manage - rename, remove, delete
Right-click the Published Collection for housekeeping:
- Rename the collection - the Google Photos album is renamed too.
- Remove from Collection on a published photo - the photo lands in a Deleted Photos to Remove section. Click Publish to sync. The photo is pulled out of the Google Photos album and moved to To Delete (Lightroom Plugin) for you to manually clean up.
- Delete the collection - this removes the collection from Lightroom only. The Google Photos album stays put (Google doesn't let outside plugins delete albums).
4. Every control, explained
Google Photos doesn't add menu items to Lightroom. Everything happens in two places: the Publish Service settings panel and the right-click menus on Published Collections. Here's each control.
The Publish Service settings panel
Open by clicking Set Up… on Google Photos in the Publish Services panel (or right-click Edit Settings…).
License field
Paste your license key here and click Activate. Status turns green when accepted. Click Deactivate to free this slot when you're moving to another machine.
Connect to Google Photos
Opens your browser, signs you in, and authorizes the plugin to upload to your Google Photos account. After connecting you'll see Connected as [email protected]. Click Disconnect to sign out from Lightroom; do that if you want to switch Google accounts.
Save
Saves your settings and closes the dialog. (Standard Lightroom Publish Service behavior - the button might be labeled Done or Save depending on your Lightroom version.)
Right-click on the Google Photos service
Create Published Collection…
Makes a new album in Google Photos and a matching Published Collection in Lightroom. The name you type becomes the album name on the Google Photos side.
Edit Settings…
Opens the Publish Service settings panel above. Use this to change accounts, fix your license, or check the connection.
Right-click on a Published Collection
Rename
Renames the collection in Lightroom and renames the album in Google Photos to match.
Delete
Removes the collection from Lightroom. The album in Google Photos stays put - Google's rules don't allow outside plugins to delete albums. Delete the album yourself from Google Photos if you want it gone.
Right-click on a published photo
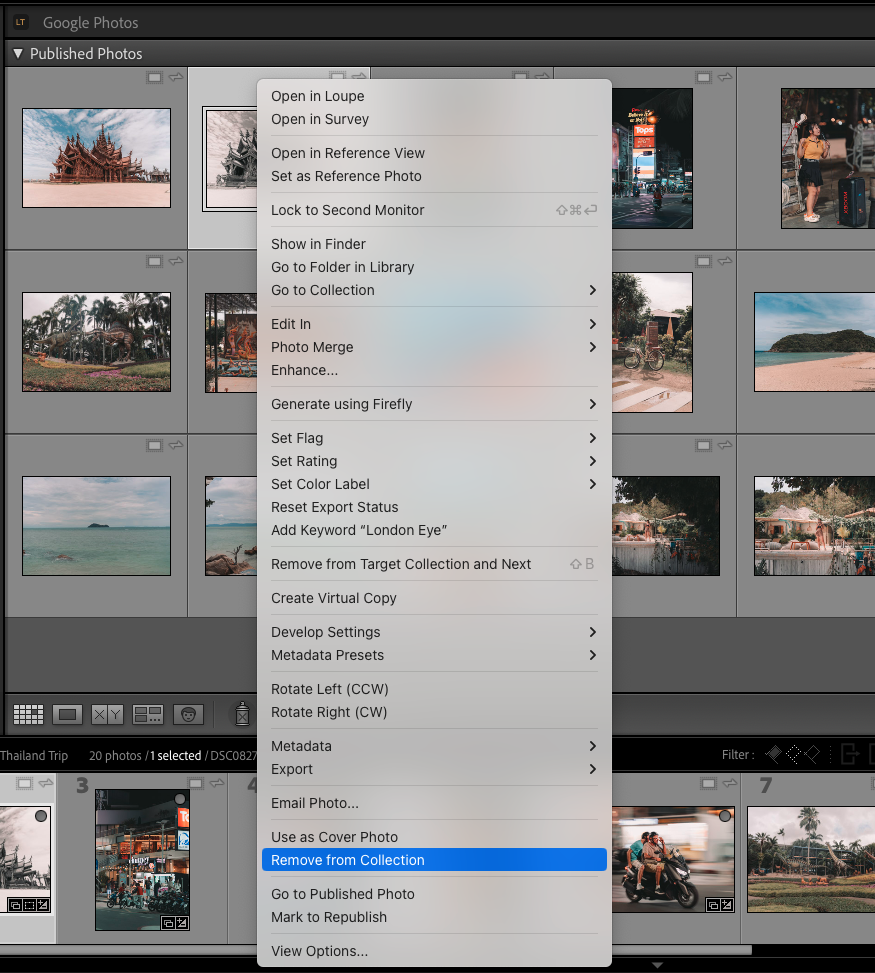
Remove from Collection
Marks the photo for removal. It moves into a Deleted Photos to Remove section in the panel. Click Publish to sync: the photo is removed from the Google Photos album and moved to the To Delete (Lightroom Plugin) album for you to clean up later.
Show screenshot - Remove from Collection
The Publish button
At the bottom of the Publish Services panel when a collection is selected. Click it to send all New, Modified, and Deleted photos to Google Photos in one go. Progress runs in Lightroom's top progress bar; the button is disabled while a publish is running so you can't double-fire it.
5. Tips for the best results
- Name your Published Collection like you want the album named. The collection name in Lightroom is the album name in Google Photos. Rename later if you change your mind - both sides update.
- Start small for your first run. Twenty or thirty photos lets you confirm the upload finished as expected without waiting an hour. Bigger batches work fine once you trust it.
- Build albums in Lightroom from day one. Because the plugin can only add to albums it created, the easiest workflow is to make every album from Lightroom. You can still see your older Google Photos albums in Google Photos - the plugin just can't reach into them.
- Drag whole collections, not folders. A Published Collection holds the photos you drag into it. Drag a Lightroom collection's contents in (or use Select All in the source) rather than a top-level folder.
- Wait a moment between huge publishes. If you publish hundreds of photos back-to-back, Google's per-minute limit can kick in. The plugin retries automatically, but pausing 30 seconds between big batches keeps things smooth.
- Don't be alarmed by "Modified Photos to Re-Publish" after keyword edits. Lightroom flags any change as a candidate, even keyword-only ones. The plugin checks before uploading and silently skips photos that didn't get a visual change.
- Visit the "To Delete (Lightroom Plugin)" album once in a while. Old versions of re-published photos and photos you removed from collections all land there. Empty it when you remember, or just leave it - nothing breaks if you don't.
6. Real-world scenarios
Three common ways buyers use this plugin. Pick whichever sounds like your situation.
Wedding photographer - 600-photo client gallery on Google Photos
You shot a wedding, you've culled and edited your top 600 photos, and the couple wants the gallery on Google Photos so the whole family can grab favorites.
How to approach it:
- Make one Published Collection in Lightroom named the way the couple will see it - for example, Smith Wedding - April 2026.
- Select all 600 finals and drag them into the collection. Click Publish. Walk away for 20-40 minutes - the plugin uploads them all and creates the album in Google Photos.
- When it finishes, log into Google Photos in your browser, open the album, and use Google's Share button to send the album link to the couple. (Album sharing is a Google Photos feature, not a plugin feature - you control it from the Google side.)
- Find a few photos the couple loved when reviewing? Re-edit in Lightroom, click Publish again. The album updates with the new versions, no duplicates.
What to expect: 600 photos at high quality takes roughly 20-40 minutes depending on your connection. The album lives in your Google Photos account for as long as you want and the shared link works for whoever has it.
Travel hobbyist - 200-photo trip album for family
You just got back from two weeks in Italy. You want a polished album on Google Photos to share with family who don't use Lightroom.
How to approach it:
- Edit your favorites in Lightroom - the 200 best of the trip.
- Right-click Google Photos in the Publish Services panel and create a Published Collection called Italy 2026.
- Drag the 200 photos in. Click Publish. Done in about 15 minutes on a decent connection.
- Open the album on Google Photos, share with your family group, done.
What to expect: the simplest flow. You'll be surprised how clean it feels compared to the export-then-drag-to-the-browser approach.
Pro re-editing hero shots - update an album without duplicates
You delivered an album of 80 portraits a month ago. Now you want to refine the color grade on the top 20 hero shots and update what the client sees - without creating a confusing second copy on Google Photos.
How to approach it:
- Open the 20 hero shots in Develop and apply your new edits.
- Go back to the same Published Collection. Lightroom has already marked those 20 as Modified Photos to Re-Publish - you don't need to do anything to flag them.
- Click Publish. The plugin uploads the new versions, and the old versions land in the To Delete (Lightroom Plugin) album in Google Photos.
- Open Google Photos, double-check the new versions are live in the client's album, then go to To Delete (Lightroom Plugin) and clean out the old versions when you want.
What to expect: the client's album link is the same, the album looks updated and tidy, and there's no awkward "wait, which one is the latest version?" moment.
7. Frequently asked questions
Setup
Where exactly do I install the plugin folder?
Anywhere on your computer that you won't accidentally delete or move. Documents, Desktop, or the standard Lightroom Modules folder all work. Once you've added it in Lightroom's Plug-in Manager, Lightroom remembers the path - just don't move it after.
Does it work on both Mac and Windows?
Yes. The plugin is pure Lightroom Classic and runs identically on both. Install and activation are the same.
How do I know my license activated?
Open the Publish Service settings (Set Up… or Edit Settings… on Google Photos in the Publish Services panel). The License section shows a green Licensed status when you're activated.
Publishing
Can I publish to an album I already created in Google Photos?
No. Google's rules don't let outside apps add photos to albums you made by hand in Google Photos. Every album you fill from Lightroom needs to be created from Lightroom (by making a new Published Collection). Your hand-made albums are still visible in Google Photos - the plugin just can't write into them. If you want to consolidate, make a fresh Published Collection in Lightroom and publish there.
What quality and format are my photos uploaded in?
Lightroom renders each photo to a high-quality JPEG using your current Develop settings. Long edge defaults are large enough for full-screen viewing on phones, tablets, and the web. You can change export settings (size, quality, sharpening) in the Publish Service settings dialog if you want something different.
How long does publishing take?
It depends on the photo size and your upload speed. Roughly 1-3 seconds per photo on a typical home connection. A 200-photo trip album is usually 10-15 minutes; a 600-photo wedding gallery is 20-40 minutes.
Can I close Lightroom while a publish is running?
No - closing Lightroom stops the upload. But progress is safe. Anything that finished uploading stays in Google Photos. When you reopen Lightroom and click Publish again, only the remaining photos get sent.
Editing and re-publishing
Will my edits replace the old version or sit alongside it?
Replace. The plugin uploads the new version and moves the old one to a clean-up album called To Delete (Lightroom Plugin). Your main album stays one-current-version-per-photo.
Why are some photos marked "Modified to Re-Publish" when I only changed keywords?
That's Lightroom's behavior - it flags any change, even a keyword or caption tweak, as a candidate for re-publish. The plugin doesn't trust that flag blindly. When you click Publish, it checks whether the photo actually has a visual change and silently skips the ones that don't. You'll see a quick note like "Skipped 3 photos (metadata only)."
What's the "To Delete (Lightroom Plugin)" album?
A holding album in Google Photos for stuff you've removed from your published collections - old versions of re-published photos, and photos you removed from a Lightroom collection. The plugin can't delete photos directly (Google doesn't allow outside apps to do that), so it stages them here for you to manually delete when you want. Empty it whenever; nothing breaks if you don't.
Albums and collections
If I rename the Published Collection, does Google Photos update?
Yes - both sides update. Rename in Lightroom; the album name on Google Photos changes within a few seconds.
If I delete the Published Collection, does the Google Photos album get deleted?
No. Google's rules don't let outside plugins delete albums. The Lightroom collection disappears, but the album stays put on the Google side. Delete the album yourself from Google Photos if you want it fully gone.
Can I have the same photo in multiple Published Collections?
Yes - that's standard Lightroom behavior. The plugin uploads the photo once per collection (so once per Google Photos album). Each album has its own copy.
Account and privacy
What permissions does the plugin ask for on my Google account?
Just enough to create albums and upload photos into them. The plugin can't read your existing photos, can't delete anything, and can't change albums it didn't create. See the Privacy Policy for the full list.
How do I disconnect the plugin from my Google account?
Open the Publish Service settings dialog and click Disconnect. To revoke access from the Google side too, visit your Google Account > Security > Third-party access page and remove "Lightroom Tools Google Photos" from the list.
Do my photos pass through any server other than Google's?
No. Photos go directly from Lightroom on your computer to Google Photos. The plugin doesn't have its own servers and doesn't see your image data. The only outside call is the license check, which only confirms your key is valid.
License and support
How many computers can I use my license on?
One at a time. To switch computers, click Deactivate on the old one first, then activate on the new one. Lost access to your old machine? Use the contact form and we'll free the slot for you.
I lost my license key. How do I get it back?
Check your LemonSqueezy purchase-receipt email - the key is right there. Can't find it? Reply to the receipt for a resend, or use the contact form and we'll look it up.
8. Troubleshooting
"Could not create Google Photos album" or "Rate limit exceeded"
Google caps how many album creates and photo uploads any account can do in a short window. If you've just done a big burst (a few hundred uploads back to back), wait 1-2 minutes and click Publish again - the plugin retries automatically on the next attempt. If it persists for hours after heavy use, you've likely hit Google's per-day limit; it resets at midnight Pacific time.
Photos seem stuck "uploading" forever
Two common causes:
- Your internet connection dropped mid-upload. Check your connection, then click Publish again - the plugin picks up where it left off.
- You quit Lightroom during the upload. Anything that finished is safe in Google Photos. Anything that didn't will resume on the next Publish.
"Connection lost" or "Authentication failed"
Your Google session expired, or you revoked the plugin's access from the Google security page. Open the Publish Service settings, click Disconnect, then Connect to Google Photos again to sign back in.
"License already activated"
Your license is currently active on another computer. Open Lightroom on that machine and click Deactivate first. If you can't reach the old computer, use the contact form and we'll reset the slot.
I'm trying to add to an album I made in Google Photos and it won't work
That's a Google rule, not a plugin bug - outside apps can't add photos to albums you created by hand in Google Photos. Make a new Published Collection in Lightroom, drag photos in, and publish there. The plugin creates its own matching album on the Google side.
The plugin says "Skipped N photos (metadata only)"
Not a problem - that's the plugin working correctly. Lightroom flagged those photos as needing re-publish because of a keyword or caption change, but they don't have a new visual edit, so the plugin skips them rather than re-uploading the same JPEG.
Still stuck?
Use the contact form - solo developer, personal responses, usually same-day. Tell me what you were trying to do and what you saw instead, and we'll get you unstuck.
9. Need help?
Send a note through the contact form or the feedback form. I read every message and reply personally - usually within a day. Include a short note about what you were doing and what happened.
- Face Tagger - tag every person in your catalog with local AI. Train once, recognize forever.
- Instagram Grid Planner - sequence your selects into a feed-perfect color flow before you post.